In this months excerpt from Stop Motion, Susannah Shaw describes how to work with companies that make models for you.

Stop Motion by Susannah Shaw. Reprinted with permission.
For professional animation, the artists at a model making company like the U.K.s Mackinnon & Saunders work from the animators sketches and then make a 3D maquette, a blueprint from which they make molds to make the models. Mackinnon & Saunders started working with Cosgrove Hall Films in Manchester in the 1970s. At Cosgrove Hall, they learned their trade as the company developed and grew. Many techniques we all use today were developed at Cosgrove Hall and many world-class animators such as Paul Berry, Loyd Price, Sue Pugh and Barry Purves learned the ropes there.
Mackinnon & Saunders specializes in models for series work and features, making puppets that are robust and easy to repair with standardized parts to keep them exactly the same all the way through the shoot.
Ian Mackinnon describes the process:
A lot of the animators weve worked with over the years have done their own model making as well. People like Jeff Newitt and Ken Lidster from Loose Moose. They would probably make their own puppets if they had time to do it. They like to give us some sort of reference to work from, whether its a sculpt or a sketch. Its the job of the sculptors then to interpret it and take it from a sketch into 3D form.
Whilst the sculptors are working on blocking the character out theyve got to be conscious of what the job entails from a stylistic point of view. If its Jeff Newitts theres a certain way that he would sculpt a character, similarly with Ken, so we try and mimic that. They would put their stamp on a sculpt even though theyre not doing it themselves. The sculptors have to mimic the style so that hopefully, when the costumes and the sets all come together, they all look like one complete world.
There might be six or seven different people working on a character at any one stage - its got to go through the mould makers and the armature makers so to have one (blueprint) model, whether its painted or whether its blocked out, is useful for everyone to go back to and make sure all the jigsaw puzzle fits together at the end. Also to make sure weve not lost something along the way, the proportions havent altered because someones taken a wrong measurement.

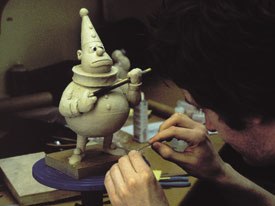
Sculptor working on a maquette. Courtesy Mackinnon & Saunders. Photo © Susannah Shaw.
The Maquette
With several characters in a story, the model makers will block out all of the characters as maquettes, spending about a day on each one to get the basic proportions. Complications of scale and proportion arise when there is a mix of human, animal and bird characters. These problems can all be ironed out in consultation with the animation director at the maquette stage.
At this stage the sculpt is made over a basic brass sleeve and wire armature, so it can be disassembled, which also helps when youre sculpting it. Little details on the hands and work on the head can be done separately, away from the body; this also makes it easier to finish off. The final materials should be decided on during the sculpting stage. Itll depend very much if the characters got to do lip sync you might want substitute or replacement mouths. If so, you would choose a hardhead. If its going to be a mechanical mouth, (Mackinnon & Saunders specialize in mechanical movement inside the head) then it would need to be silicone or foam. Using a mechanical head is a costly process.
All the separated elements then go to the mold-making department. The whole process of building up the puppets is dealt within different departments: sculpting, mould making, casting, painting and armature-making. Once the sculpt is approved, the armature is machined and assembled.

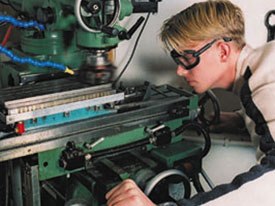
Working on a mill. Courtesy John Wright Modelmaking.
Ball and Socket Armature
A ball and socket armature is more durable and reusable, altogether tougher than a wire armature, and is necessary when a puppet is being made for series or feature work. Apart from its strength, it gives the animator a greater degree of control for finer, smoother movements.
English armatures tend to be made with steel rod and plate construction with ball and socket joints. Joints are made with one or two steel or phosphor bronze ball bearings sandwiched between balanced steel plates. U.S. armature makers use steel rods and ball bearings made with chromed mild steel. The steel balls are annealed (heat treated) to strengthen them. Blair Clark, now a visual effects supervisor at Tippett Studio, was a model maker on Tim Burtons Nightmare Before Christmas and recalls, The animators required joints that could take a great amount of wear and tear. Light scoring on the balls, caused by tightening of the joints, could easily render the armatures unusable. So to prevent constant breakage of the armatures, we made them very strong. I remember the English animators who came over, Loyd Price and Paul Berry, were surprised at how hard they were!
Making Your Own Ball And Socket Armature
If you are considering making your own ball and socket armatures from scratch, it can be a bit complex, but possible. The cost of the quality of equipment you need to make ball and socket armatures could become prohibitive. Rather than considering buying your own lathe, it maybe wise to approach a local art college. A jewelry-making department, or even a sculpture department will have all the equipment you need and may relish a challenge.
However, it is much easier to make one up from a kit. You can order all the pieces you need from some model making companies (see appendix 1 for addresses). They can usually supply you with the information you need if you are going to build your own.
Tools that you will need to make up your armature include: a hand blowtorch, pliers and Allen keys. Cheese head, flat head and grub screws are useful. Use silver solder, as soft solder wont solder stainless steel. Dont try using glue for holding your armature together it will fall apart under any pressure! Health and safety warning: Take great care using a blowtorch. Use a mask when using silver solder as it releases harmful fumes.
Good communication is essential when ordering a ready-made armature so get your dimensions right and use graph paper to draw a plan of your armature. (See image of scale drawing for armature.) Its useful to show the dimensions of the covering material as well. You may know what size and type of joints you want, if you dont its useful to indicate on the drawing where and how your character will need to bend. It may be useful to fix a lightweight block of balsa or insulation board on the chest or hip plates, below the covering surface as something for the animator to get hold of, a grabbing point.
Depending on how many limbs your character has, whether its humanoid, quadruped or even alien, you should be aware of the way it moves; this will then determine what kind of joints and what size of joints it will have. For instance, the hip joint scan have a lot of wear, so you would be better spreading the tension over a double joint at the top of the leg, but you should use a single joint at the elbow to avoid it bending back on it self. Single joints allow for single ax is movement, and double joints or full rotation, but beware of double joints folding over on to each other.
Humanoid Joints
Neck Double joint to allow for full rotation Shoulders 2-1⁄2 x double joints Elbows Single joint, for single plane of movement Hips Double joint Knees Single joint Ankle Single joint Foot Hinged plate (a single flat plate foot makes walking very difficult)
Rigging Points
Your character might need to fly or leap through the air, in which case it will need a safe point to attach it to a rig. You may want to incorporate a K&S rigging point either on the hips or chest of the puppet. This would slot into a corresponding brass tube on the rig. Or you might want to attach the puppet to wire, in which case you can attach tungsten wire, which is fine and very strong, and almost invisible. Or fine fishing line this can catch the light a little more but it can be dulled with wax, blackened with felt tip, or even colored to match its background.
To keep the puppet steady you will want two or more rigging points the neck and the waist. For professional filming, the safest method is to use a rigging stand, with ball and socket joints; these can be painted out in post-production. The reason I mention this is for professional filming is that painting out a rig in post-production is very time consuming and therefore expensive, and should be avoided as far as possible. Learning to animate with the idea that you can change everything in post is not going to be a very instructive process.
Dont over-tighten joints never use excessive force manipulating the joints on your puppet, you can easily buckle the plates or rods. Once they are buckled they are very difficult to repair. If you feel that a joint is becoming too loose or too rigid it may be that the Allen key is worn, or that the bolt heads inside are worn which can be worse, as they then become impossible to remove. Use Allen keys of the necessary sizes to make fine adjustments to the joints when necessary. It is useful to keep a drawing showing the joints and which keys are used for which joints, either to save time, or if you have someone else animating your puppets.
To read more about craft skills for model animation, check out by Susannah Shaw, Burlington, MA: Focal Press, 2004. 206 pages with illustrations. ISBN 0-240-51659-1 ($34.95).
Susannah Shaw is program development manager for the Animated Exeter Festival. She was head of Bristol Animation Course from 1996 to 200 at the University of the West of England and former camera assistant at Aardman (working on Close Shave among other films).


