Renowned drawing instructor Glenn Vilppu offers the eigth installment in his bi-monthly Animation World Magazine online drawing course.
This is the eigth in a series of articles on drawing for animation. In these articles I will be presenting the theory and practice of drawing as a "how to" instructional series. The lessons are based upon the Vilppu Drawing Manual and will in general follow the basic plan outlined in the manual. This is the same material that I base my seminars and lectures on at the American Animation Institute, UCLA, and my lectures at Disney, Warner Bros. and other major studios in the animation industry, both in the U.S. and their affiliates overseas. Most lessons will also be accompanied by short QuickTime clips of me demonstrating the material discussed. If you have not seen the previous lessons starting in the June 1998 issue of Animation World Magazine, it is recommended that you do. The lessons are progressive and expand on basic ideas. It is suggested that you start from the beginning for a better understanding of my approach.In the last lesson, we concentrated on the specific landmarks of anatomy we use with the symmetry of the figure to help us see and draw the action of the figure. The next step in using anatomy is learning to see the large anatomical masses. In the first four lessons we laid much of the groundwork by concentrating on simple forms as a means of analyzing the figure as a total. This lesson is a continuation of that procedure, breaking those larger units into smaller units, while at the same time adding a new level of believability to our drawings. Of course, we are also adding to the complexity of our drawing. It is important to remember that these new forms that we add should not distract from the readability of the action. Any additions of detail should help to clarify the action and add to our understanding of the subject.Remember, do not copy, but analyze the model.

All drawings in this article are by and © Glenn Vilppu.
Exercises in Form
First, we need to look at some basic ways that forms connect. Illustration No. 1 gives you some of the basic situations in which forms interact. The primary ingredient in achieving any success at this hinges upon your ability to analyze form. There are two main elements of this analysis. The first is to be able to see the total, which has been the primary concern of these lessons up to now. The second is to develop the ability to see the surface of the form. This will be a primary ingredient of the next few lessons. Illustration No. 1A shows a simple raised area of a form. It is important that you develop your skill in analyzing this simple kind of form. One way to start doing this is to take some kind of striped material and drape it over an object or just crumple it up. Now take your pencil and follow a line going up and down and around, following the line until you reach the end. Do this for each stripe until you have a clear picture of the surface of the form. This is no different than a computer generated wire frame drawing of an object. See Illustration No. 2A. Illustration No. 2B may look different but the way the lines go over and around the form are actually very similar to 2A. The main difference is that the lines are not as mechanical in feeling or application.

Illustration 2.
Many art school exercises that have become art forms in themselves are based upon dealing with this basic problem. To achieve success at this you must visualize your pencil as actually being on the form that you are drawing, reacting to every nuance of change in direction that the surface of the form takes.
When I was in school, I had an instructor suggest that you should pretend that you were an ant crawling over the surface. At the time I thought how ridiculous this was. What I wanted to do was draw like Michelangelo, not like an ant walking across an arm. The imagery may have seemed ridiculous but the attitude and skills developed by the exercise were not. In fact, looking at the great masters, including Michelangelo, you will notice the incredible level of skill they had in being able to describe form, be it a building or an arm.
Finding Volume
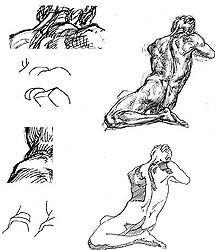
Now let us look at some of the basic elements that are represented in the examples of Illustration No. 1. When you are drawing form you are primarily involved in showing the change in direction of a form. That is why it is so important that you understand and can clearly describe the surface of the form you are drawing. In Illustration No. 1A, the way in which the small form overlaps the larger form gives a strong sense of relief or 3D. Look at Illustration No. 3 and compare the different ways the drawings were done. Notice how the overlapping and feeling of going behind aid in giving a sense of volume to the form. Conversely, notice that by not overlapping or by creating tangents the form tends to flatten out.

Illustration 3.
Study the drawing below and the details to see how overlapping helped to give a sense of volume. Then compare it with the same drawing at the bottom of the page without many of these same tools that help to create a sense of volume.

Illustration 4.
Basic Anatomical Masses Explained
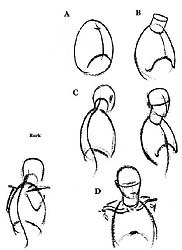
Let us start going through some of the basic anatomical masses we deal with in the figure. Keep referring to Illustration No. 4 as you read this explanation. Of course, the basic form of the upper torso is the oval of the rib cage (A). This is the foundation on which we build. The neck is a simple cylinder (B) and the head another oval (C). In Part One (Lesson No. 7), the clavicle and scapulas were some of the landmarks that we discussed in our initial stages of the drawing.
Now visualize these two elements as a yoke that slips over the neck and rests on the rib cage (Illustration No. 5). Next, from the front, look at the pectoral muscles (Illustration No. 6). They attach to the rib cage and to the clavicles at the top, the sternum in the center, and pull over to the arms from the rib cage. Do not lose sight of the round mass of the rib cage.

Illustration 5.

Illustration 7.
From the back, notice how the scapula floats on top of the rib cage (Illustration No. 7). The muscles of the scapula (infraspinatus, teres minor, and teres major) build on top of the basic scapula form. We, at this point, also have the latissimus dorsi muscle which lies over the bottom of the scapula, pulls up into the arm at the top, and goes down to the pelvis at the bottom. These forms pull into the cylinder of the arm. The top of the cylinder is the deltoid we discussed in the previous lesson. Notice how the pectoralis major, the teres, and the latissimus dorsi give a strong sense of 3D by their overlapping. As the pectoralis and teres muscles fit into the arm, you should be seeing them as parts of simple cylinders. You should not miss any opportunity in using lines that go across or around the form to describe volume. It is also important, at this point, to look at the trapezius muscle. First, the trapezius helps us see the end of the neck as it fits into the skull. As the muscle comes down to the shoulders, it comes around to the clavicles and attaches around the arc of the clavicles and scapula meeting the end of the deltoid and continuing down the spine of the scapula. The critical area in drawing this muscle is the transition across the shoulder to the neck. Don't think just anatomy, but try to use your understanding of the anatomy to create form.

Illustration 9.
Moving down the back, we have the two large muscles that go along the sides of the backbone (sacrospinalis), coming from the sacrum up along the back bone fitting into the ribs. Again, notice how the basic volume of the rib cage is still the dominant element into which these forms fit. The buttocks muscles, the gluteus maximus and medius, attach to the sacrum and the illiac below the crest, and insert at the hip bone (the trochanter of femur). Depending on the model, these forms lend themselves to simple spherical forms or boxes. The main point is to look for the inside corners of the form and pay particular attention as to how they connect to the leg. As we start around toward the front again, the external oblique, or flank pad as it is called, is the dominant form. The bottom margin is the iliac crest of the pelvis. The top fits into the ribs interconnecting with the muscles coming from under the scapula. At this point, concentrate primarily on the basic shape and how it works with both the pelvis and rib cage. This is the form that we most often see, stretching and compressing or bulging out. It is important to see how the rib cage fits into it. From the front, the primary muscle that we work with is the rectus abdominis (Illustration No. 9) which is attached at the top of the rib cage, and at the bottom, to the pubic arch. The main elements are the clear boundaries on the sides and down the center. The tranverse line created by the interrupting tendons are what give the characteristic shape of well-developed stomach muscles. The planes created by similar lines on the sides, those that separate the rectus abdominis from the external oblique, are important elements in understanding the major forms of the front of the torso.

Illustration 10
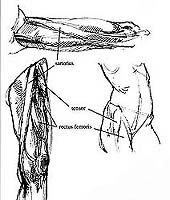
In looking at the connection of the legs to the torso (Illustration No. 10), it is important that you remember that the large muscle in the front, the rectus femoris, does not attach to the iliac crest but goes between the tensor and the sartorius muscles. The "A" shape created by the tensor and sartorius are part of the corner of the box shape used in seeing the pelvis. The rectus femoris, along with the vastus lateralis and vastus medialis, are the main elements of the cylinder of the leg from the front. In the back of the leg, the biceps femoris, along with the semimembranosus and semitendinosus, are the main elements of the cylinder. Notice how the adductors pull from the pubic arch area and complete the triangle from the pubic arch to the knee. In the back of the knee (Illustration No. 11), the gastrocnemius, or calf muscle, goes inside the tendons of the biceps femoris, semimembranosus, and semitendinosus, to create the characteristic squarish shape of this connection.
In looking at the connection of the legs to the torso (Illustration No. 10), it is important that you remember that the large muscle in the front, the rectus femoris, does not attach to the iliac crest but goes between the tensor and the sartorius muscles. The "A" shape created by the tensor and sartorius are part of the corner of the box shape used in seeing the pelvis. The rectus femoris, along with the vastus lateralis and vastus medialis, are the main elements of the cylinder of the leg from the front. In the back of the leg, the biceps femoris, along with the semimembranosus and semitendinosus, are the main elements of the cylinder. Notice how the adductors pull from the pubic arch area and complete the triangle from the pubic arch to the knee. In the back of the knee (Illustration No. 11), the gastrocnemius, or calf muscle, goes inside the tendons of the biceps femoris, semimembranosus, and semitendinosus, to create the characteristic squarish shape of this connection.

Illustration 12.
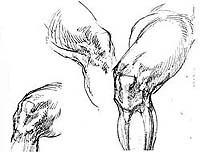
In the front, the corners of the knee (Illustration No. 12) are created by the patella with the quadriceps tendon and, to the sides, the epicondyles of the femur. The angle across the calves is high on the outside and low on the inside. However, at the ankle, the outside is low and the inside is high. The arc created by the tibia and fibula is a primary line showing the connection of the leg to the foot in front. (Illustration No. 13) In the back, the achilles tendon attaching to the calcaneus, or heelbone, is the characteristic look. Try to view the foot as simply as possible in the beginning, focusing on simple volumes.

Illustration 14.
In looking at the arms (Illustration No. 14), try to see the overall simple masses of the forms as you study the anatomy. It is very easy to get so involved with anatomical detail that you lose sight of the whole.In drawing the wrist, remember as we discussed in the last chapter, that the radius rotates and the ulna is stationary. The wrist is more simply seen as a box form.
In teaching the drawing of the hand (Illustration No. 15) I have found that if you first start by developing your skill at drawing the simple forms of the animators' hand and then slowly introduce the real anatomical hand, it is easier to control the complexity and develop a method to draw and understand the forms.Glenn Vilppu teaches figure drawing at the American Animation Institute, the Masters program of the UCLA Animation Dept., Walt Disney Feature Animation and Warner Bros. Feature Animation, and is being sent to teach artists at Disney TV studios in Japan, Canada and the Philippines. Vilppu has also worked in the animation industry for 18 years as a layout, storyboard and presentation artist. His drawing manual and video tapes are being used worldwide as course materials for animation students. Glenn Vilppu first wrote for Animation World Magazine in the June 1997 issue, "Never Underestimate the Power of Life Drawing" His drawing manuals and video tapes may now be purchased in the Animation World Store.


