VFXWorld presents a new excerpt from Building Interactive Worlds in 3D by Jean-Marc Gauthier. This month, from the Basic 3D Kit, we present a tutorial how to create a 3D immersive environment.

This is the next in a series of excerpts from Building Interactive Worlds in 3D by Jean-Marc Gauthier. For the next few months, we will be presenting chapters from a section entitled The Basic 3D Kit.
This tutorial introduces you to Mayas 3D Paint Effects, allowing you to paint in 3D. A few strokes can paint trees, grass or flowers. The paint strokes from your brush are converted into 3D objects inside a 3D space. Mayas ability to convert 3D Paint Effects to polygonal objects is helpful in creating content for interactive environments. This tutorial requires Maya 5.0 or higher.
You can control the strokes shape, color and density while painting on the horizontal grid plane of the perspective view or directly on other 3D objects.
Lets grab a brush and start to paint trees and grass in 3D. Lets create the ground for your forest.
Creating the Ground
-
Open a new scene in Maya.
-
Go to the top menu, and select File > New Scene.
-
Select the Modeling module in the box located on the left of the Status Line.
-
Create a polygonal plane for the floor of your scene.
- Go to Create > Polygon Primitives > Plane.
Painting the Trees
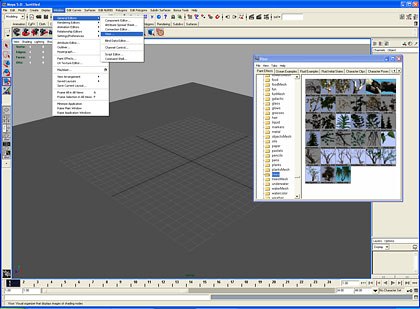
A library of Paint Effects can be found in the Visor module.
To open the Visor window, go to the top menu and select Window > General Editor > Visor. Multiple folders with preset brushes are available. You can select a variety of paint effects inspired by natural forms by clicking on the folder named trees.
To Resize Your Brush:
Go to the top menu and click on Paint Effects > Template Brush Settings. The Paint Effects Brush Settings dialog window opens. Select the Brush Profile. Set the Global Scale Slider = 2.0.
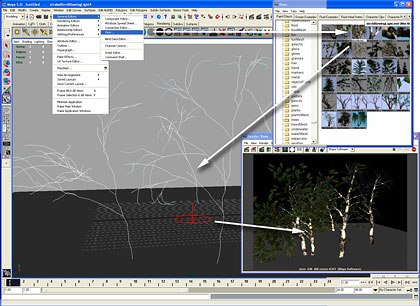
Go to the Visor dialog window. Select Trees or MeshTrees. On the left side of the Visor window, click on the icon of the .mel file called birchBlowingLight.mel.
Go to the Workspace and click and drag the mouse pointer a short distance near the Origin center in the Perspective window.
Maya creates randomly generated lush trees with a realistic look.
Render the scene to see the final result.
Painting Grass
Lets paint some 3D grass.
Go to the Visor dialog window. Select Grass on the left side of the Visor window, and click on the icon to choose the grass of your choice.
Important note: Because you will convert the content from your 3D painting into polygonal meshes, you have to keep an eye on the number of polygons. The density of the brush strokes needs to be kept low.
Lets control the creation of your vegetation by tweaking parameters inside the Attribute Editor.
To tweak parameters for your brush stroke in the Attribute Editor:
Select the brush stroke and press the Control + A keys. In the Attribute Editor, check Sample Density and Tube Segments, which are the main parameters.
Two or three types of trees are needed for your scene in Maya. Once you import the trees in Virtools, you will clone them to create a whole forest.
The limit for the total number of polygons created inside a scene is 50,000. To view the polygonal count, go to the top menu, and select Display > Head Up Display > Poly Count. Check the number of Faces rendered in the scene.
Conversion of 3D Models to Polygonal Meshes
Lets convert the Paint Effects to 3D objects made of polygonal meshes.
To convert the 3D Paint Effect to polygonal meshes:
Select one of the strokes from the Outliner window or from the perspective view. Choose Modify > Convert > Paint Effects To Polygons. The output from the conversion is a high-resolution model with a high polygonal count.
Reducing the Number of Polygons
Lets see how Maya can help you reduce the polygonal count.
Select the Modeling module in the box located on the left of the Status Line.
To reduce the number of polygons for a tree:
Lets control the number of polygons for the tree.
Go to Display > Heads on Display > Polygon Count. Go to the Rendering menu and select Paint Effect > Paint Effects Mesh Quality.
Decrease the number of polygons by moving the sliders to the left for Tube Sections and Segment, and check the number of polygons on the Polygon Count. You will notice that this operation can radically alter the shape of the model. In most cases, you will need to use the following polygon reduction to reduce the number of polygons while keeping the integrity of the 3D object.
Select a tree and choose Polygons > Reduce. Click on the box located on the right of the word to open the Polygon Reduce Options dialog window.
Enter the percentage of reduction. Go to Preserve. Check the following parameters, and keep Mesh Borders, UV borders, Hard Edges. Click Reduce.
Keep reducing the polygon count until your tree has less than 15,000 polygons.
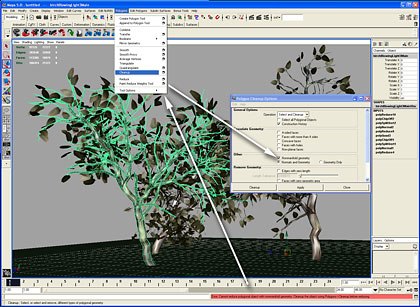
If you get a message saying Cannot Reduce Polygonal Object with Nonmanifold Geometry, go to the top menu and select Polygons > Cleanup. Click on the box located on the right of the word to open the Polygon Cleanup Options dialog window.
Go to Other and check Nonmanifold Geometry and Normals and Geometry. Press Clean Up and repeat the reduction process.
Please note that another way to lower the polygon count is to make quadrangular meshes. Maya creates triangular meshes by default.
You have created a 3D tree made of two 3D models, the branches and the leaves. Before exporting to Virtools, you should combine the two models into one. Select all the branches and leaves for the tree and go to Modeling > Polygons > Combine.
Materials and Textures
Lets open the Hypershade window to assign materials to your 3D models.
To open the Hypershade window, go to the top menu and select Window > Rendering Editor > Hypershade.
Name the leaves material LeavesSG. Name the trunk material TrunkSG.
To select one material in the Hypershade window:
Go to the main menu in Hypershade. Select Graph > Input and Output Connections. You will see a network of connections that Maya generated after converting the trees to polygons.
You are looking for more information about textures, so double click on the texture icon and check the path of the texture that is used for the trees. The file is stored in Program Files > Maya > Brushes > Trees > pine2LeafShader.
The texture used for the leaves is called sideleaf.iff. For the bark of the tree the texture is called wrapBark.iff.
Save your scene as forest.
Find more turnkey tutorials that detail all the steps required to build simulations and interactions in by Jean-Marc Gauthier: Focal Press, 2005. 422 pages with illustrations. ISBN 0-240-80622-0 ($49.95). Check back to VFXWorld frequently to read new excerpts.
Jean-Marc Gauthier teaches at New York University in the graduate studies department of Interactive Telecommunications and is the author of Interactive 3D Actors and Their Worlds (Morgan Kaufmann Publishers 2000). He is also a consultant at www.tinkering.net and an award-winning 3D artist.


