Alain Bielik reports on the more ambitious vfx utilized in Underworld: Evolution, resulting in a pipeline shift by Luma Pictures and further reliance on ZBrush.

The vfx in Underworld: Evolution is more ambitious than the original. The budget allowed for 225 vfx shots, but in the end there were 553. © 2006 Screen Gems Inc. All rights reserved. Courtesy of Sony Pictures.
In 2003, Underworld made a strong impression on horror fans around the world with a fancy cast (Kate Beckinsale and Scott Speedman), an intriguing storyline (Romeo and Juliet among vampires and werewolves), brilliant direction by Len Wiseman and innovative creature work by Patrick Tatopoulos. Three years later, the same team brings us Underworld: Evolution, a sequel for which Tatopoulos served as creature designer/fabricator and production designer. Also returning was overall visual effects supervisor James McQuaide, who recently oversaw the effects work on The Cave.

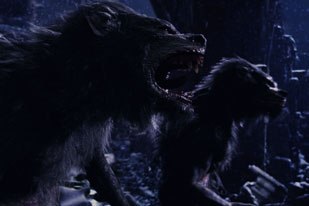
Above, two CG characters complete a transformation from humanoids to werewolves in a mostly CG background reconstruction.
As always with sequels, Underworld: Evolution was far more ambitious than the original movie, especially when it came to vfx. Going into production, we were budgeted for roughly 225 visual effects shots, McQuaide recounts. However, this is a fraction of the total number in the final cut of the picture. The cost of the extra shots was covered, to a large degree, by Lakeshore and Screen Gems allocating more money once the picture was in post. It also helped that, as an exec producer, McQuaide had access to all of the lines in the budget. This provided for some very important financial flexibility. For example, when it became clear that the picture was going to be shorter than the 120 minutes that had originally been budgeted for, McQuaide was able to save money on digital intermediate, IPs, INs, etc., and invest it into new visual effects shots. It may not sound like a very large savings but, on a picture as tightly budgeted as this one was, it really made a world of difference. In the end, there are 553 digital effects shots in the picture, plus about 800 opticals [speed ramps, re-pos, camera shakes, fades and dissolves].
In the end, McQuaide had to tackle the intimidating challenge of having to produce more than 500 highly complex digital effects shots for less than $7 million. We were fortunate enough to collaborate with a group of smaller visual effects houses who could work within our budgetary limitations, and still deliver shots on a quality level equal to anything out there. Also, because there was a great deal of wire work and simple compositing required for the picture, vfx co-supervisor Gary Beach and I set-up a small vfx company in my office Sub/Par Pix that ended-up delivering 122 shots. While it did increase the day-to-day workload a bit, the net savings was very significant: it probably paid for most of the shots featuring CG William, the pictures main werewolf. Most importantly, Len Wiseman was both pragmatic and decisive: everything we had to work with ended up on the screen. There were only three vfx shots that didnt make it into the final cut.
The shots that couldnt be done at Sub/Par Pix were spread among eight vendors, with Luma Pictures leading the pack. In some cases, multiple houses worked on a single shot, which was especially true with the miniature work (ship, helicopter, dungeon):
-
Luma Pictures: 195 shots
-
Ntropic: 79 shots
-
Furious FX: 78 shots
-
Company 3: 42 shots
-
Cafe FX: 23 shots
-
Krypton: 15 shots
-
Framestore CFC: 12 shots
- Fantasy II Film Effects: 73 miniature effects shots, plus insert elements

Luma Pictures relied heavily on ZBrush for etching the definition of the models, including creatures and CG environments. Here is an entirely CG shot of Marcus, the main antagonist, transforming from human to creature.
Defining CG Creatures in ZBrush
Almost all of the shots involving 3D work were done by Luma Pictures, and supervised by co-founder Payam Shohadai. With almost 200 CG-heavy shots on its workload, Underworld: Evolution was the largest project that the company had ever tackled. Shohadai took this opportunity to implement a pipeline shift that he had initiated on The Cave: We use Maya for animation and creation of our base cages/low res models. But our modeling pipeline is more and more heavily relying on ZBrush for etching out the definition of the models, including the creatures and the CG environments. As a matter of fact, for this movie, we had characters that needed to be able to transform into multiple different characters. So our base character mesh was shared across many of them. Then, all of the detail that was painted into the creature with ZBrush was applied as displacement at render time.
Lumas CG supervisor, Vince Cirelli, oversaw this innovative use of ZBrush: At the beginning of production, we experimented with different techniques that would allow us to push the characters range of motion and skin deformation beyond most CG creatures, Cirelli says. Using ZBrush, we painted displacements to simulate muscle flexing, tendon bulging and skin wrinkling for each muscle group. These maps were separated into color and displacement. Once this was done, we needed a way to trigger and blend between specific displacements and surface textures based on how the creature was animated. For this, we developed a system of animating and blending localized displacement maps using a custom shader. The shader evaluates where and what has translated or rotated on the rig. It then sends this information to the blender which determines how much of each displacement to use and where to use it. So when the werewolf rolls his shoulders, muscles flex, tendons bulge and veins become visible on the surface of the skin.

The director wanted the transformations to be more spectacular and detailed than in Underworld. This time around the crew was able to develop effects that were dropped due to lack of resources on the first movie.
While CG elements were mainly rendered with mental ray, proprietary tools generated all of the separate passes and created a default script, which pre-composited all of the passes into a beauty composite in Shake. The compositor had the option to use templates as a starting point of the comp, or to use a completely different approach.
As expected, the director wanted the transformations to be more spectacular and detailed than in Underworld. To this purpose, the crew went back to many of the ideas that had been developed for the first movie, but never realized because of a lack of resources. The concepts were based on making the transformations seem as real as possible. For example, as the bones began to pop and shift into place, blood vessels beneath the skin burst, and the resulting bruising caused the skin to change to the blue/black color of the werewolf. In the first movie, this change had been handled as a color wash; for the sequel, the effect would be much more developed.
Crafting Foldable CG Wings
All of the creature transformations were handled by Luma Pictures. Every humanoid character that underwent transformation had to have a CG double for the so-called digital handshake, the moment where effects artists swap out the live actor for his CG counterpart. After modeling and texturing the character based on the provided reference, Lumas artists chose a match frame, the frame at which the CG actor had to look identical to the live actor. The CG character was then hand animated to match the motion around the frames of the digital handshake, and to be in an identical pose at the match frame. Shohadai explains. We would add any additional details from this frame, such as blood and dirt to the texture maps of the CG actor. Then, we would light the 3D scene to match the actor as closely as possible and render with buffer frames to allow a bit of wiggle room in the comp. In the end, the audience shouldnt be able to see where we transitioned from live actor to CG. The creatures were then created using two techniques. For shots that didnt require any significant action from the creatures, the production used performers in animatronic suits. But every time a shot necessitated rapid movement or dynamic action, such as a werewolf running or tackling a guy on a horse, the characters were created in CG at Luma. Theres also a transformation shot in which Marcus face is coming right into the camera and its all CG. The level of textural and model detail painted into the character is amazing: you can see the fine wrinkles and pores of his face

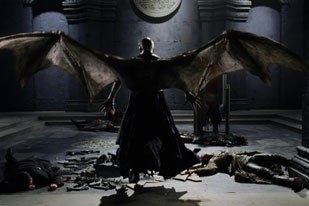
Marcus is always portrayed by a real actor, with the wings added in CG. The characters ability to fully retract his wings into his back posed a big challenge.
The lead antagonist in the movie is Marcus, an impressive character whose wings turned out to be one of the most complicated effects. Early on, it was decided that Marcus would always be portrayed by the real actor, with the wings always being added in CG. Not that much of a deal, apparently, except that the character was designed with the ability to fully retract his wings into his back a typical product of Tatopoulos fertile imagination. The designer had based his concept on butterflies emerging from their cocoon, and pumping blood into their wings to deploy them into full span. Easy to design, much tougher to realize!
Since his wings had to be large enough to convincingly carry his weight while flying, the major challenge was the simple logistical matter of where to put all that wing when it did retract, while keeping it real and believable let alone the typical challenges that come along with a prominent winged character, such as membrane dynamics and geometry penetration, Shohadai observes. During the wing transformations, we had to pull a lot of tricks to reduce the overall volume of the wings to a size that could believably fit into Marcus back, without giving an obvious appearance of scaling geometry. For this, we had to custom create a volume deformer for Maya, which allowed us to trigger a series of animated displacement maps and targets controlled by a complex rig. Animation supervisor Cameron Gray and his team of animators could then move the deformer through the wing and watch the membrane retract and wrinkle, which helped in creatively reducing the wing volume, without getting the look of linear scaling. The fully rendered wings were then integrated into the shots under compositing supervisor Justin Johnsons guidance.
Last-Minute Headaches
Although the creature work logically ended up being the most visible effects work in the movie, it was not the most demanding for the effects team. Indeed, the most challenging sequence in the entire picture didnt include any creature at all. It featured a helicopter approaching an island and circling the decrepit fortress located at the top of it. Approved very late in post-production, the shots involved a full-on 3D approach and were rushed through Lumas pipeline. The construction of the all-CG fortress, island, water, mountains, fog and helicopter was an enormous task, McQuaide acknowledges. The team at Luma did a tremendous job of catching-up, getting elements like the textures of the stone walls and water to look photoreal in a remarkably short period of time.

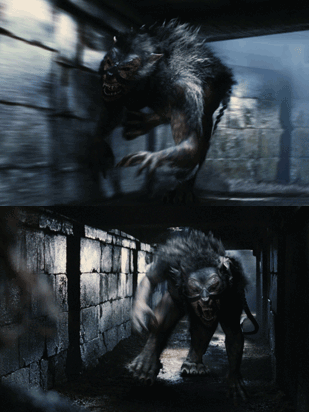
Luma Pictures developed a system of animating and blending localized displacement maps using a custom shader. When the werewolf (above) moves, its muscles, tendons and veins become visible on the surface of the skin.
For Shohadai, the sequence was the films most challenging in terms of photorealistic visual effects: While the CG creatures and transformations were very creatively and technically challenging, they were ultimately fantasy and, in some ways, simpler than making the CG fortress a believable setting for the ending of the film. Part of the reason the fortress was so challenging was the fact that it was a complete CG fabrication, with no reference and very minimal design guidance to go off of. It is much harder to create something photoreal when you dont have a specific reference (as we did for the creatures). And our primary guide for right or wrong had to be derived from a mix of dissimilar castle photos we found online, none of which looked anything like what we were supposed to create. Just achieving the base scale and realism of this dilapidated fortress, compounded by the additional environmental elements, made this one of the most challenging and satisfying undertakings in my career.
The fortress was created using Maya, ZBrush and Photoshop. All the effects for the sequence, including the fog and the water, were created using Maya. Texture/matte painting supervisor Christopher Sage oversaw the process of creating the fortress, which involved modeling of a low resolution mesh of the fortress in Maya, and painting all the texture maps except the bump and displacement with Photoshop. Surface relief details were then created in ZBrush, down to the individual stones of the walls. Using ZBrush, we were able to achieve an incredible amount of detail, so rendering those scene files proved to be a monumental task in itself, Shohadai notes. We created the fortress in self contained chunks, which allowed the individual structures to go through refinement without waiting for massive renders to see progress. As different areas progressed, they would automatically be updated in the master scene. Since certain shots required the fortress to displace at a per brick level, there was no way to render the fortress traditionally. So we created a tool that allowed us to render the fortress in sections, and then merge those sections together while maintaining the integrity of reflections, shadows and holdouts.
As post-production was nearing completion, Luma and McQuaide ran into an unexpected scale problem with a small portion of the fortress sequence. Once fully rendered, the approach toward the compound didnt look as large as it was supposed to be, simply because the helicopter appeared to circle it way too fast. While the block animations looked good enough for us to sign off on the speed of a particular shot, when all the elements were rendered, textured and lit, there were a few shots involving the fortress that suddenly felt as if we were traveling much too fast in relation to the size of the fortress we had imagined, McQuaide recalls. Because this realization occurred just days before delivery, there was only time to re-animate a couple of the shots; the rest were run thru Furnace, a series of plug-ins for Shake the specific plug-in we used was Kronos. It did a remarkable job of saving those shots in a pinch. As last-second icing on the cake, Luma was able to add CG crows circling the fortress towers and, at Lens suggestion, to increase the spec on the water, so there would be some visual clues in the frame for the audience to reference for scale. We were re-working those shots literally until a few days before the premiere, and well probably keep on refining those shots for the DVD release. While there will always be room for improvement on visual effects as demanding as these, in the end the shots truly look epic.
Alain Bielik is the founder and editor of renowned effects magazine S.F.X, published in France since 1991. He also contributes to various French publications and occasionally to Cinéfex. Last year, he organized a major special effects exhibition at the Musée International de la Miniature in Lyon, France.


