In the latest excerpt from Learning Maya 7 | Foundation, Marc-AndrGuindon and Cathy McGinnis cover spherical mapping while texturing a polygonal meshing.

This is an excerpt in a series from Learning Maya 7 | Foundation by Marc-André Guindon and Cathy McGinnis from Alias|Learning Tool. In the Texturing the Orb excerpts, you will learn to texture a polygonal meshing. Even though polygons have a default setting for UV parameters onto which textures can be applied, you will need to adjust these settings for each specific application. You can use special polygon tools to assign and modify these kinds of values on the orb.
You will first apply texture projections in order to create UV coordinates on the polymesh. Then you will texture map the orb using a series of texture maps imported as file textures.
In these Texturing the Orb excerpts, you will learn the following: How to project textures on polygons, how to manipulate projections; how to use the Texture Editor; how to use the Paint Selection Tool; how to manipulate UVs and how to animate a texture.
Spherical Mapping
The body geometry of the orb will be textured using a spherical projection. A spherical projection works just like the planar projection, except that the texture is wrapped around your model on a sphere, like a wrapper on a candy.
- 1. Apply a spherical projection
-
Assign the metalBlinn material to the body.
- With the body mesh selected, select Polygon UVs > Spherical Mapping.
A large spherical manipulator is positioned around the selected geometry, defining the way the texture is wrapped around the object.
- 2. Tweak the spherical projection By default, the texture does not cover the entire projection sphere. For the entire sphere to be covered, the texture is tiled and repeated. In this case, you want the texture to completely wrap the object.
- Click+drag the red manipulator handle all the way to the back of the sphere until the projection joins together.


- 3. Cover the projection sphere
- Click+drag the green manipulator handle and move it all the way up to completely cover the projection sphere.

Note: Keep the Texture Editor open to see the effect of the placement on the geometry as you move the manipulators.
- 4. Relaxing UVs When using projections, you often get texture stretching on faces perpendicular to the projections direction. The following is a polygonal texture operation that can help solve that problem:
-
With body selected, select Edit Polygons > Selection > Convert Selection to Faces.
This will take your currently selected components and covert them into face components.
- Select Polygon UVs > Relax UVs.
Note: Notice the relax operations result in the UV Texture Editor.
- 5. Create a new shader
-
Create another Blinn material node and rename it circuitsBlinn.
-
Map the Color attribute with a File texture node.
-
Rename the file1 node circuitsFile.
- Click on the Folder Icon button and select the circuits.tif image file from the textures folder.
Tip: Hold b while click+dragging in the viewport to dynamically change the brush size.
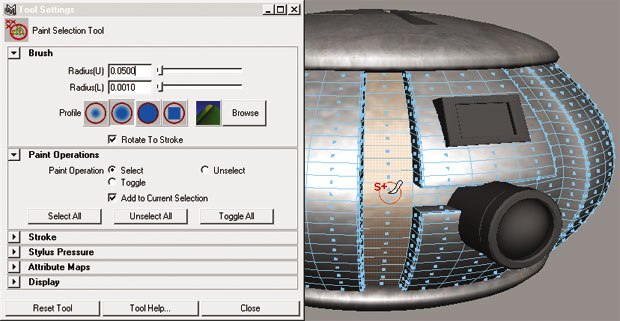
- 6. Using the Paint Selection Tool In order to select faces to assign the new circuits shader, you will use the Paint Selection Tool. This tool allows you to select components on an object by simply painting on the surface.
- With the
body selected, press F11 to display the polygonal faces.
Select Edit > Paint Selection Tool > .
The tools window appears.
Set the brush Radius(U) to 0.05.
Tip: If you select unwanted faces by mistake, you can change the Paint Operation in the Paint Selection window to Unselect or hold down Ctrl, just like selecting components.
-
- Paint on the grooves of the body geometry to prepare the selection for the circuitsBlinn material.
- Once all the faces are selected, assign the circuitsBlinn to the selection.

- 7. Using another spherical projection The faces you just assigned with
circuitsBlinn dont need to be relaxed as in the previous step. You can use another spherical projection to correct this, but this time only on the selected components.
-
Still with the groove faces of body selected, select Polygon UVs > Spherical Mapping.
- Use the spherical manipulator to place the texture correctly on the surface.
Note: Note that the two spherical projections are still accessible in the construction history through the Channel Box. To make any refinements to the texture positioning, select the polySphProj input node and the Show Manipulators Tool.
Find out more about building an orb and other topics in Learning Maya 7 | Foundation by Marc-André Guindon and Cathy McGinnis: Alias|Learning Tools, 2005. 642 pages with illustrations and DVD. ISBN: 1-894893-74-3 ($69.95). Check back to VFXWorld frequently to read new excerpts.
Primary author Marc-André Guindon is the founder of Realities Studio, a Montreal-based production facility. An advanced user of both Maya and Alias MotionBuilder, Marc-André and Realities have partnered with Alias on several projects, including The Art of Maya, Learning Maya 6 | MEL Fundamentals and the series Learning Maya 7. He had developed plug-ins and tools for films and games, including the Outlaw Game series. He served as td on XXX2, State of the Union, Scooby-Doo 2 and Dawn of the Dead.
Contributing author Cathy McGinnis is an Alias certified instructor teaching at the Media Design School in Auckland, New Zealand. Cathy was previously a technical product specialist for Alias, specializing in rendering in both Maya and mental ray for Maya. She has been a contributor to several Alias publications, including Learning Maya | Rendering and Learning Maya | Foundation.


