Scott Spencer reveals how ZBrush 3 stands ready to further shake the paradigms of digital art and asset creation.

ZBrush 3 stands ready to further shake the paradigms of digital art and asset creation. One of the first things you will notice is the new ZBrush interface. All images courtesy of Scott Spencer, unless otherwise noted.
Upon the release of ZBrush 2 everything changed... In a short span of time, modeling started giving way to the idea of true digital sculpting, and the forums saw an influx of highly detailed creatures and characters of steadily increasing quality. ZBrush 2 was a defining moment in the evolution of a medium, which can truly be called groundbreaking. Not only did Pixologic redefine modeling, they helped usher in a new era where artists could truly manipulate form in the computer in ways that were previously unheard of. As a sculptor myself, it was the first time I was confident I could use the computer as an artistic tool without feeling like I was leaving something behind in the clay.
Here we are four years later and ZBrush 3 stands ready to further shake the paradigms of digital art and asset creation. Originally envisioned as a 2.5 update, this long awaited release has evolved into a full version upgrade, which appears to be a rewrite from the ground up.
As the digital art director at Gentle Giant Studios, I was fortunate to be asked to join the initial beta test of Pixologic's ZBrush 2.5. My team has been present to watch the evolution of this amazing piece of software into the powerhouse sculpting and design tool it is today. I would like to share some of my impressions of the new features and improvements to the program that are found in ZBrush 3.

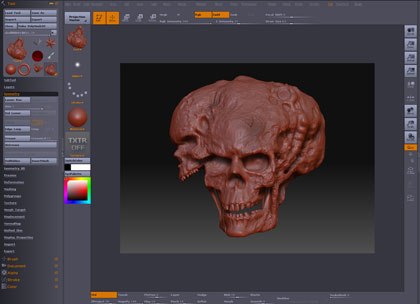
Here are examples of ZBrush 3's realtime shadowed clay shaders.
Among the additions are a sleeker interface, more production friendly options, as well as a toolset, which has grown exponentially into a true sculpting workshop. Just a few of the new options available to the artist include customizable brush presets, viewport sculpting independent of Projection Master, sculpting rakes, layers for both painting and sculpting, subtools and Remeshing tools, which allow you to recreate the underlying topology of any model in ZBrush without sacrificing hours of sculpted detail. High-Definition sculpting allows for billions of polygons at a time while code revisions make ZBrush more stable and much faster than before. Also rewritten is the OBJ exporter, which will now allow you to export millions of polygons to a single OBJ file for use with rapid prototyping and exporting to applications such as XSI. This functionality was previously only available in the Mac version of ZBrush 2. All of this and it is entirely free to registered 2 users!
Interface Upgrades
One of the first things you will notice is the new ZBrush interface. Now even more customizable than before, artists seeking a more standard set of menus will find the Rapid Start mode especially compelling. Designed to help learn the basics of ZBrush rapid start features a standard file edit menu as well as persistent edit mode. It is impossible to drop the tool you are working on. This sculpting mode is extremely useful and can be easily expanded to include other menus. Another long awaited improvement is a persistent perspective camera, which remains active while you sculpt. There is even now support for rotations around a single axis, much like what many of us are accustomed to in other 3D packages.
With the easy customization built into ZBrush 3, I expect the forums to be full of new interface designs that are suited to the workflows of individual artists and tasks. This is a perfect example of how ZBrush strives to be by artists for artists.
The interface is designed more for digital sculpting than the previous focus in ZBrush 2, which was more tailored to 2.5D illustration. While the illustration tools are still available and benefit from the new powerful enhancements to the program, the focus is now on sculpting and painting. Screen real estate is given over to brush options at the bottom of the document window making your tools much easier to access than before.
The first thing users will notice on opening a model to sculpt is the new realtime shading engine. Realtime materials create realistic shadows that update while you work without the need to render. These materials also feature translucency so default skin and wax shaders are available as well as the option to edit and create your own. The new default red wax shader gives the impression of sculpting in actual wax with amazing realtime shadows as you work. Other new materials strive to mimic the look of real world sculpting clay, like Polymer clay, as well as gray materials very similar to Roma and Chavant.

ZBrush now features rake brushes, which are a crucial way to quickly and organically create forms while keeping a live surface. Here are examples of a surface sculpted using the rake tools to add and subtract clay. © Pixologic.
New Brushes and Brush Customization
ZBrush 3 has added new sculpting brushes, as well as several custom macros, which combine settings into interesting and useful tools. In keeping with the Pixologic tradition of tools designed around existing artistic approaches, many of these new brushes reflect real world counterparts such as mallets, chisels and rakes.
Rakes are my personal favorite of the new tools available as they are integral to my own work in clay. Traditional sculptors have long used serrated sculpting tools to gradually reduce the surface unifying subtle forms. ZBrush now has this same function with the rake brushes but the added twist you may add or subtract with the rake tools. These are a crucial way to quickly and organically create forms while simultaneously keeping a live surface, which can remain in this rough stage or be further refined to a fine finish. One major benefit of sculpting with rakes is that it creates an interesting surface texture, which leads to many interesting accidents in texture that can be further developed into your surface details. The smooth brush has also been reworked to allow you to soften just the hi-res details without destroying the base forms of your sculpture.

The Skeleton creature is sculpted in Z3, rendered with realtime cavity shading.
ZBrush 3 also introduces the idea of Macros to save custom brushes allowing limitless variations in your standard toolset. This Macro function allows the user to set up brush settings and save them in the interface so they are available between multiple ZBrush sessions or even shared among other users.
Realtime Sculpting and Polypaint
In ZBrush 3 Projection Master has taken a backseat to realtime sculpting and painting in the viewport with no need to drop to the canvas. Your brushes can now be controlled by alpha and stroke in realtime to have the most control over surface detailing. There is no more need to drop into Projection Master for pores and veins. With ZBrush 3's improved speed and interactivity, millions of polygons can be manipulated at once on screen with your entire alpha library.

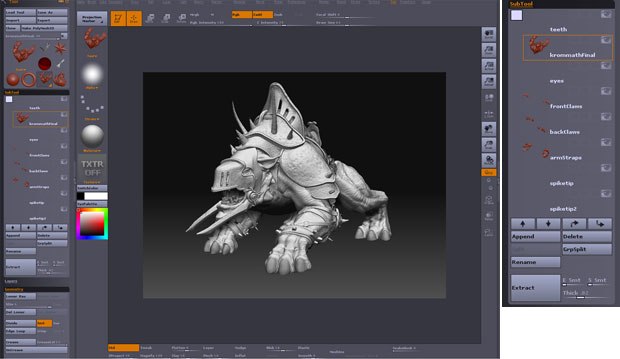
Character sculpture with Subtools. © Gentle Giant Studios.
Polypaint extends this same workflow to painting by allowing you to apply color directly on the model without the need to drop to the canvas. This makes many painting techniques far easier and more intuitive. Many times I find myself trying to paint a model maintaining a unified color scheme made difficult when the process is continually broken by constant dropping and picking up. Polypaint is a per-vertex painting solution so it is completely independent of your UVs. Once your color map is completed you can then bake the map into any UV set you desire! In my own workflow, this has created an enormous level of freedom in being able to both sculpt and paint long before UVs are completed.
Subtools
One of the most useful additions to the program is the ability to work with limitless subtools. Multi part models can now be imported and each piece sculpted separately. This can be a simple as adding eyeballs to a head or as complex as multi-layered armor elements on a biomechanical humanoid character. The ability to isolate and work elements independently on each other adds an enormous level of versatility to the tool and you can still add a separate texture and material to each part. These pieces are linked, and remain in edit mode while you work. In addition, you can dynamically switch between subtools by simply CTL-Click on the part you want to activate then start sculpting. Each subtool can be subdivided into millions of polygons and each can carry its own UVs and displacement maps.

One of the most useful additions to the program is the ability to work with limitless subtools. Multi part models can now be imported and each piece sculpted separately.
Mesh Extraction
Creating costume elements is now as simple as painting a mask. Mesh Extraction works by taking the masked areas of a model and generating a new subtool object based on the existing geometry. These parts can quickly be remeshed inside of ZBrush keeping all your hi-res details in a multi level ZTool. This feature alone can vastly increase the speed at which accessories such as clothes and armor can be created for a character. In my own workflow, I find I can easily create complex costumes such as armor, boots, gloves and shirts by using a combination of masking with alphas and mesh extraction. This can save days of poly modeling required by standard approaches.
Transpose Brush
In ZBrush 2, models were essentially locked in the pose they were imported as. The focus became sculpting details and form onto neutrally posed characters. With the addition of transpose functionality you are now free to break these dull stances into dynamic and beautiful posed figures. It is exciting to feel like a sculptor introducing character into your work rather than dealing with the same T pose every day. In previous versions, it was necessary to spend some time rigging level 1 in Maya or Max and exporting a posed mesh to ZBrush. This would almost always result in distortions and detail loss in areas of the mesh after the pose. Poses may also be stored in layers so a single tool can have many different poses associated with it. Combining posing with layers also allows for sculpting symmetrically on a character in an asymmetrical pose as transpose not only allows you to quickly and intuitively pose the mesh, but also retain all of your detail across every subdivision level.
The transpose line allows you to drag from the center of the bone movement to the end of the limb. Any unmasked areas will be unaffected by the move so if you mask the body and leave the arm unmasked you will rotate just the arm. It is worth noting that Transpose also works in symmetry so you can pose both sides at once then work with symmetry off on just one side. If you click the last circle you can move in a fashion similar to Forward Kinematics rigged skeletons. The center ring will rotate the joint, like a forearm, while the last joint moves or rotates as well. One noteworthy addition is what's called bone posing. If you drag a transpose line to a joint such as the elbow and Alt click drag, it will bend the elbow, stretching faces on the bone side and compressing and swelling faces on the bicep side: effective built in muscle deformation!

A creature sculpt in the ZBrush viewport being sculpted in realtime with interactive cavity shading active and the ZBrush 3 Layers menu.
Layers
ZBrush users have been waiting for layered sculpting for a long time. With Z3 you can have limitless layers for everything from low frequency form to high-resolution details. A single base mesh can have a layer for muscle tone, one for costume elements, and others for variations in skin textures. Each layer has independent intensity sliders and visibility controls. Erasing work contained in a layer is as simple as switching off visibility or lowering the layer's intensity slider. Layers may also be used to store poses from the Transpose brush. You can now have a T pose layer as well as several pose layers, and you can interactively move between them as you work.
HD sculpting
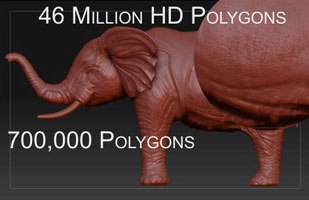
ZBrush 2 subdivision limits often meant the artist could not exceed a few million polygons before they ran into the system limits of the machine. This frustration is removed with the advent of High-Definition Sculpting. HD allows the sculptor to work with literally billions of polygons in a single mesh subdividing and working on just the areas that require detail. Simply add regular subdivision levels to a pint the model can be easily manipulated in the document window then add HD subdivisions. HD allows you to divide up to a billion polygons only displaying those that can be easily worked onscreen.

An example of a mesh sculpted with HD subdivision. © Pixologic.
All of this sculpting can ultimately be captured in multiple high-resolution, 32-bit floating point displacement maps for rendering. My first experiment in HD was dividing a mesh into 1 billion polygons and zooming into the corner of the eyelid to sign my name with a standard brush and a freehand stroke, all while still in standard edit mode. The days of picking up from Projection Master to find washed out details are now behind us.
Topology Tools
Retopologizing tools forms the basis of my entire workflow. I prefer to work from simple meshes then create ordered models after the fact. I find this workflow allows not only the maximum number of subdivisions to a mesh but also keeps the artist free from being locked into certain forms by the underlying base mesh. An even and simple base mesh insures that the polygons will be distributed evenly across the surface of your high-resolution model with a minimum of pinching or bunching artifacts. While we used to use GSI or Paraform to accomplish this, the functionality is included in ZBrush 3. In addition, artists can import an arbitrary mesh and project high-resolution details onto it.

ZBrush 3 topology tools in action. Here we are remeshing a scanned head into an animation ready mesh.
Masking with Cavity
Dry brushing is a painting technique that allows you to dust color over the raised texture of a model. This is an ability I have longed for in ZBrush for quite some time.
Masking by Cavity makes this and more possible. You now have the ability to paint only on the raised portions of your sculpture or in the recessed areas bringing painting in ZBrush even closer to painting in the real world, adding some functionality that's only possible in the computer. With the new mask by cavity function, you can paint or sculpt controlling the depth at which your sculpting action affects the surface. This allows you to paint only the scales of a character, for instance, or paint the scales and then change just the color in the recesses between effortlessly. A new function of masking is that when you CTL-Shift-Click a masked area ZBrush will soften the mask's edges. If you press the alt button the same function will soften the edges.

Hi-res wrinkled mesh (left); masking as produced using the cavity mask features. Only the low areas of the wrinkles are defined (middle); a quick polypainting stroke with cavity masking on (right).
Combine this functionality with the new ability to use masks inside Projection Master and ZApplink, and the possibilities grow into a staggering number of new techniques limited only by the user's imagination.
It is also exciting to note that ZBrush now is designed to use point updates so we will not have to wait for another full upgrade for the addition of new features. Pixologic can now release additions to the core code, easily expanding on an already fantastic package. Lead developer Ofer Alon, and the Pixologic team are artists, and ZBrush is the canvas with which they create. I see ZBrush as a work of art itself, a new and always exciting way for me to create digital art. ZBrush 3 stands again as proof that Pixologic is a company driven by artists and artistic innovation.
Currently the digital art director at Gentle Giant Studios, Scott Spencer designs for various media, including digital characters for film, broadcast and games as well as physical sculptures for concept design, promotion, premiums and other applications. Credits include X-Men 3, The DaVinci Code, Harry Potter and the Order of the Phoenix, Iron Man, Species 4, Pumpkinhead 3 and others. Currently Scott is working on the creature and character designs for Sega's remake of the classic game, Golden Axe. A longtime beta tester and consultant to Pixologic, Scott is the author of the Official ZBrush to Maya ZPipeline guide as well as several popular video tutorials. He is a regular instructor at The Gnomon School of Visual Effects, where he teaches digital sculpting and character creation.


