Zez Vaz, founder of Toma Creators Studio, shares how to use the dynamic content pack ‘Make Me Actor’ and ‘Instructional Tools’ to transform objects and images into speaking actors for use in talk shows, e-learning animations, and teaching resources.
About Zez Vaz
Hello everyone! Today's tutorial dives into crafting an engaging animation intro using Power Tools Vol. 2: Interactive Learning Bundle for 2D Animation - Make Me Actor and Instructional Tools. I'm Zez Vaz from Toma Creators Studio. I had the pleasure of co-directing and animating Walter Precipitous, a short film delving into the water cycle, along with numerous educational videos, all brought to life using Cartoon Animator 5.
Interactive Learning Bundle for 2D Animation
We'll be delving into the dynamic content pack Make Me Actor and Instructional Tools, specifically how these tools empower you to transform objects and images into speaking actors. You can also customize ready-made actors and infuse vitality into animations using various text motions and animated props that cater to both experienced creators and novices. Make Me Actor boasts a wide array of distinct character templates and offers over 100 facial and body animations – perfect for making talk shows, tutorials, and more. You can alter the text within the props to suit your preferences and seamlessly create e-learning animations and teaching resources by blending cartoon characters with interactive quizzes that make for a fun learning experience.
Trying out the Content Pack
Start from scratch by downloading the pack, then navigate to the “Content” page where you'll find it. Click on the “Instructional Tools” tab to access a wide array of props and animations at your disposal. I opt for the “Characters” prop, which makes the word “Sample” materialize on the stage. Here, I can select an animation and apply it to the prop.
Moving on to the “Make Me Actor” feature, I have the liberty to choose a character and incorporate it into my scene. Navigating to the animation templates, I select from the diverse array available — there are lots of animations, and there is so much you can do with them!
I decide on one and promptly position the character to point at the text. The animation is visibly represented in the timeline beneath the “Motion” category. Should I desire to layer another animation, I can choose an additional one, and both will seamlessly combine.
Additionally, I introduce the “Pop Stars” prop, accompanied by an array of other props and characters onto the stage. The options are nearly limitless, enabling us to populate the stage with a variety of elements.
Creating a Custom 2D Character Design
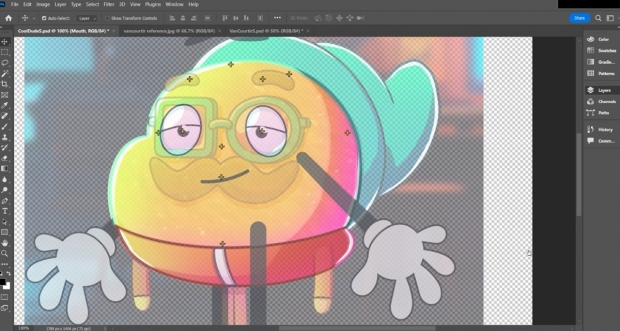
Let's craft a personalized character puppet. I opt for a Make Me Actor character and enter “Composer” mode. From the left panel, I click on “PSD,” launching the character in Photoshop. Here, I fine-tune each layer and the defining points that correspond to the skeletal structure. Leveraging the Van Courtir character, I swap out layers with his images. Using a faintly transparent version of the character as a guide, I meticulously align the bones and substitute layers with appropriate labels. With the edits complete, I save the PSD file and return to Cartoon Animator 5, where the character has seamlessly transformed into the one I just tailored.
Next, I introduce accessories like a beanie hat, sunglasses, and a mustache, treating them as props within the 2D character design. To infuse vital movements, I apply spring effects to these props. For added control, I integrate bones into the mustache and navigate to “Composer” mode's left sidebar, where I access the spring dynamics. Switching back to the character, I enter “Composer” mode again and strategically position each custom prop, linking them harmoniously to the puppet's structure.
Customizing the Text Props
Now, I will personalize the “Characters” prop (found in the Instructional Tools), but this time, we'll click on “SVG” instead of “PSD.” By doing so, the prop opens in Adobe Illustrator, where I'll choose a font type and proceed to replace each letter with its updated counterpart. The three distinct words I will be work with are “Van,” “Courtir,” and “Show.”
Editing the Animated Cartoon and Exporting the Project
Finally, I include a background picture from Freepik to establish the desired mood. My preferred animation templates feature Van Courtir's actions, complemented by the addition of the “Pop Stars” prop and a corresponding animation.
Prior to finalizing this animated cartoon, I integrate a music file into the timeline and introduce a subtle camera movement. To achieve this, I access the camera settings, applying a slight zoom on the concluding frame. With the scene now completed, I save the project and export the 2D animation as a video.
I trust you'll find this content bundle engaging and versatile across various scenarios. Should you encounter any challenges with Cartoon Animator 5, the comprehensive online manual serves as an excellent resource for troubleshooting. Additionally, Reallusion's YouTube tutorials offer valuable insights.
Happy animating!
Zez Vaz: https://zezvaz.com/
Toma Creators: https://www.tomacreators.com/
Van Courtir: https://www.instagram.com/vancourtir/
Walter’s YouTube: https://www.youtube.com/@walterprecipitous
>> Know more:
2D Animation Software for Cartoon Maker | Cartoon Animator
>> FREE for 30 days & get 1,700+ ready-made assets:


