Alain Bielik is transported to the land of Stormhold and discovers how the vfx wizards conjured up the world of Stardust.

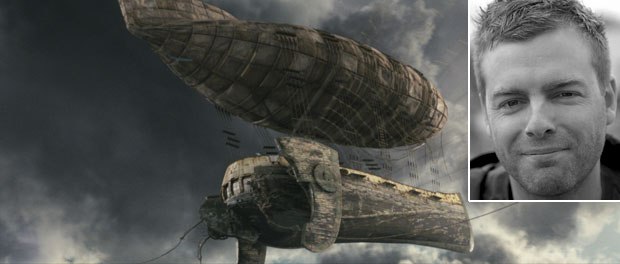
Visual effects supervisor Peter Chiang and his team learned the geography of Stardust's world well. All images © Paramount Pictures. Courtesy of Double Negative.
When he started preparing Stardust (opening Aug. 8, from Paramount), director Matthew Vaughn had just directed Layer Cake, a gritty thriller. He thus went straight from the gloomy world of cocaine dealers to a fantasy world populated by magical characters, all of which requiring hundreds of high-end visual effects. In this adaptation of a novel by Neil Gaiman, a young man named Tristan ventures into a magical land to retrieve a fallen star for his beloved. The quest marks the beginning of a wild adventure filled with pirates, kings, ghosts and witches.
Working with the director to realize the 830 VFX shots was visual effects supervisor Peter Chiang along with vfx producer Tim Field. 350 shots were assigned to Double Negative where digital supervisor Mattias Lindahl oversaw the effort. The remaining shots were spread among six different vendors, including LipSync Post, Cinesite, The Senate, Baseblack, Machine and Rushes. Mattes & Miniatures provided miniatures.
Geography Lessons in CG
For Double Negative, the main challenge laid in the creation of vast environments. "Matthew wanted to join certain scenes to explain the geography of where the story was taking place at every moment," Chiang says. "So, we always shot the front end and the back end of those shots as a live-action plate. We would start with an actor and initiate the camera move on set. Then, we would transition into a camera move over a CG environment, and the shot would end with a live-action plate filmed on another set. By opening and ending a shot with real actors, the scene would be better anchored in reality."
The environments were based on The Isle of Skye in Scotland, and Iceland, where most of the location work took place. A company supplied high resolution digital terrain maps and texture maps of those locations. "The terrain maps didn't come with fine displacement maps, which meant that it only worked from a certain height," Chiang notes. "And the trees lacked foliage. So, we used the maps to generate the basic terrain model with its elevations, and then further developed it with Double Negative's proprietary software Tecto."
Tecto is a landscaping tool that was originally created by Double Negative for the aerial scenes in Flyboys, of which Chiang was also the vfx supervisor. "It allows us to work with huge amounts of image data," Mattias Lindahl says. "The individual tiles where 4k each. Tecto manages all that data for you, only pulling in the bits you need at render time. It also allows you to output low resolution versions that we can work with in animation and previsualization. Most of our shots where high enough off the ground, so we had a good level of detail in the photography." Surrounding the CG terrain was a 3D cyclorama of tall mountains created within Maya. Shots were rendered in RenderMan and composited in Shake.

Mattias Lindahl used proprietary tool dnCloud to fill the skies of Stormhold with clouds. Courtesy of Double Negative.
Sculpting clouds
The Double Negative team made great use of dnCloud, a proprietary tool that was also developed for Flyboys. "In that movie, most of the clouds were created as a backdrop with the action taking place in the foreground," Chiang notes. "This time, we needed to travel between cloud formations. It was very important to give a sense of speed in the Sky Vessel scenes. Also, we wanted to be able to show different types of clouds under varying lighting conditions: sunset, night, overcast, etc. So, dnCloud was developed further to allow us to light the CG clouds in any way we wanted."
Adds Lindahl, "On Flyboys, we built arenas with a limited number of clouds placed in advance of 3D artists getting their scenes. For Stardust, 3D technical supervisor Gavin Graham and his cloud team created a library of clouds that an artist could use to populate any given shot. This included cloud 'chunks' and wispies that could be used as building blocks to create bigger unique cloud shapes as the shot required. We then made shader improvements, so we had more control over noise and density at render time. Senior programmer Jeff Clifford made optimizations to our in-house voxel rendering system DNB, so we could push through way more cloud data than ever before. DNB then output preset passes for 2D to have control over re-lighting them and generating different looks for any time of day in the comp script."
For shots requiring rolling storm clouds, dynamics technical directors Nicholas New and Jan Althaus developed a method of creating clips of rolling particles that got passed into DNB, where they had cumulus noise blobs instanced onto them at render time.
A key issue that needed to be addressed was render time. "We had a few shots that ran for about a minute," Lindahl observes. "The idea was to spit out as many passes as possible with secondary displays. It gave the compositor all the creative control he or she wanted."

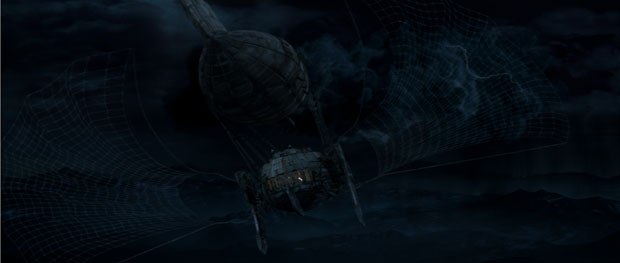
Many action sequences during the course of the film involved the flying vessel. Courtesy of Double Negative.
The Sky Vessel
During the course of the action, Tristan meets a group of pirates whose ship is actually a gigantic balloon carrying a stylized Victorian vessel. The plates were shot on stage on a partial set surrounded by a 360° greenscreen. All the shots required the creation of a CG environment, combined with set extensions on the ship. Double Negative's CG supervisor Rick Leary, 2D supervisor Paul Riddle, sequence lead Matt Twyford and their team started by photographing every inch of the full size set. "We needed to photograph the vessel set in neutral light, which couldn't be realized on the greenscreen stage," Chiang recalls. "So, we waited until the set was being struck, and we took all the pieces away to be photographed under ideal light conditions. In the end, from bow to stern, the stills represented more than 40,000 lines."
Using proprietary software STIG, artists stitched the photographs together and created the textures. These were then projected onto a Maya geometry, and baked using two in-house tools, dnPhotoFit and dnPlaneit. The balloon was created from scratch, based on artwork provided by the art department. Some of the longer shots featured an entirely CG vessel, including digital crewmembers.
As if dealing with pirates were not enough, Tristan is confronted by three evil witches. Two of them required the creation of a highly complex "signature" magical effect. For Lamia, it was a raging green fire, a CG effect combining particle animation and joint-driven soft body ribbons. For Sal, it was a dirty black smoke that could turn into objects or beings. The effect was created by turning animated geometry into a target-driven fluid simulation, which allowed for a much more controlled result than plain simulation.

LipSync Post had to manage keeping the fallen star Yvaine glowing even in tough situations. Courtesy of LipSync Post.
Glowing Issues
Another company involved in the creation of some key effects for the movie was LipSync Post. Sheila Wickens supervised the project with CG supervisor Graham Cristie, compositing supervisor Glen Pratt and head of film/vfx producer Stefan Drury. To create its 180 shots, the team used a Maya/Mental Ray/Shake pipeline.
LipSync Post was responsible for the signature ethereal glow that surrounds Yvaine, a central character that turns out to be the fallen star Tristan is looking for. The effect eventually appeared in more than 80 shots. "When we started working on the glow shots, a 3D approach had been considered, but the budget didn't really allow for that," Pratt observes. "Our job was to come up with a creative 2D solution to the shimmer shots that could be applied procedurally. Altogether, there were around 150 R&D versions before the final look was decided upon. We used two main methods: optical flow data to allow for the movement and intensity of the glow within the shots, a technique combined with noise to create an organic feel, plus proprietary plug-ins to create and animate the beams."
The CG team also focused on a complex sequence featuring a telescope. The camera had to pan across the night sky and pull back through the telescope before emerging into a live-action plate of an observatory. "The shot was made up of various layers: the exterior night sky, the full moon, the iconic star, the telescope body, the lenses, the prism, the light beam that splits into a spectrum on hitting the prism and some dust particles for added atmosphere," Sheila Wickens says. "These were all composited in Shake where a warped distortion effect was applied to give the feeling of passing through the lenses. Also in Shake, we used a ReelSmart plug-in that allowed us to apply motion blur to the CG render. This proved to be a much speedier option than rendering it in 3D, and also allowed us to tweak it until we were happy with the look. For the shots inside the observatory, we created the open retractable roof and the night sky in CG, and matte painting of Victorian London."
The team used ambient occlusion to help create realistic lighting for the interior of the telescope. This was rendered as a separate pass, so that the amount of light and shade could be controlled in the Shake composite. Pixar's Alfred software was employed to manage the allocation of resources on the render farm. The 3D renders were broken down into multiple passes, to give greater flexibility in the compositing stage. The team also rendered a pass for motion vectors, which were used in the ReelSmart Motion Blur Shake plug-in, to further reduce 3D render times.
Digital Makeover
Although Double Negative handled the witches' magical effects, LipSync Post handled the key transformation scene where evil witch Lamia grows younger. "We were provided with several motion control plates: a clean background plate, a plate with the two sisters, one pass of Lamia with all of the prosthetic makeup and straggly hair on her, and then one pass of her as the beautiful Lamia," Pratt says. "One final pass featured the hair being pulled through a dummy head. Used in reverse, this element achieved the feel of the hair growing on Lamia throughout the shot. This element was retimed and frame blended adding to the overall ethereal feel of the shot. During compositing, a procedural glow effect was applied during the rotation."
During the final showdown, Yvaine demonstrates the power to control light in a deadly manner. In this scene, the director wanted the audience to be blinded by the star. To create the effect, the team added 3D particles to create a dome of light, energy and dust around her. This was then combined with the signature glow. "One aspect that we really pushed was the use of lens flares to give the shots a feel that the camera was struggling to cope with the intensity of the light being created throughout the sequence," Pratt notes. "Lens flares are commonly used, but we made sure that they mimicked the behavior correctly, avoiding an over the top CG feel."
Ghost Story
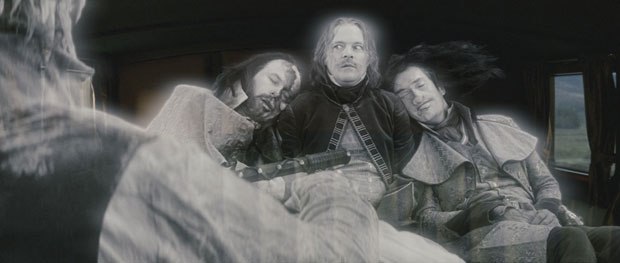
Meanwhile, at Cinesite, visual effects supervisor Stuart Partridge and his team were using their Maya/RenderMan/Shake pipeline to craft some 80 shots. Most of the assignment involved creating the ghosts of seven heirs to the throne. The plates were shot in front of a greenscreen with actors wearing prosthetic make-up. The first step was to clean tracking markers from greenscreen using Shake paint and roto toolset. Then, the team pulled key using Shake with Primatte and Keylight plug-ins. At that point, the element was desaturated by 40-60%. A blurred ghost element was then keyed back over itself using the highlights, and the background was keyed back through the low lights. Finally, additional glow was created using a proprietary Cinesite toolset written for Shake.
For the final characters' ascent to heaven, Cinesite started by applying the established ghost treatment. Then, a transition to mid state was designed in Shake using filmed elements of practical water and smoke. Ghost elements were warped into mid state with additional glow and color grade effects. The transition into particle state was accomplished in 2D using Shake and particle elements created in Maya. Several layers of particles and glowing balls transitioned on and off to facilitate transition upwards and off screen.
Another Break In The Wall
Parallel to the other vendors' effort, The Senate VFX and visual effects supervisor Simon Leech were busy tacking a completely different range of effects encompassing 80 shots. The team used Maya and Modo for modeling, Maya for animation, Photoshop and Zbrush for texturing, and Mental Ray for rendering. Compositing was carried out in Shake 4.1 and AE7.
The company was responsible for set extensions on the magical wall that separates the real world from the enchanted world beyond. A 20-foot practical wall was built on location for principal photography. "In most shots, the wall would enter frame left or right and would need to be extended into the distance," Leech explains. "Thin green poles with red led tracking markers on top would be put into the ground at intervals beyond the area where the wall ran out. This gave us points to track, but also enabled our matte artist to see how the ground curved and also reference for perspective. Once a concept was approved by Peter, we would then produce a finished painting that would be tracked in. The start for most paintings would be to clone areas of the original wall into the distance, and then repaint where duplication occurred adding in new highlights on the wall and grass."
For another sequence, the team needed to create magical lightning fired by Tristan. They were generated by animating paint effects along a curve in Maya. Each tendril had its own painted texture to give the lightning an interesting form. The curves were then animated to make the lightning wipe around and react to the on-set lighting and pyrotechnics. Various passes were rendered out, so that the compositor had control over the depth, color, texture and reactive lighting. On the other hand, practical flame and smoke elements were used to create the effect of a character firing flames at another.
The Senate VFX also created a CG sword for a fight involving Tristan. "We were supplied with lidar scans of Tristan's sword, which were then cleaned up in Modo," Leech says. "Photos were taken of the prop sword and used as textures. We then 3D tracked each shot."
An Enjoyable Trip
For Peter Chiang, Stardust is now old story as the final shots were delivered six months ago, in February. He has since supervised all of The Bourne Ultimatum. Still, he keeps fond memories of that prior project. "It was a really enjoyable movie to work on," he concludes. "The director knew what he wanted, Neil Gaiman's universe was more than stimulating. In the finished movie, you can really feel how much care was put into it."
Alain Bielik is the founder and editor of renowned effects magazine S.F.X, published in France since 1991. He also contributes to various French publications, both print and online, and occasionally to Cinefex. In 2004, he organized a major special effects exhibition at the Musee International de la Miniature in Lyon, France.


