Image Engine VFX supervisor Joao Sita oversees the delivery of 266 visual effects shots for the first season of the Netflix series reboot.
The shipwrecked family from The Swiss Family Robinson authored by Johann David Wyss in 1812 was transported from an uncharted island to a mysterious planet in the original Lost in Space, which aired back in 1965. The television series famous for Robby the Robot declaring “Danger, Will Robinson,” was relaunched on Netflix with Jabbar Raisani (Game of Thrones) supervising the visual effects for the first season which included contributions from Image Engine on 266 shots featuring a forest fire, a bisected robot, an alien butterfly, a spaceship falling off of a cliff and battling robots.
Visual effects plates were turned over to Image Engine in June 2017, with final delivery taking place in February 2018. “I was on the show for a full year,” recounts Image Engine VFX supervisor Joao Sita. “It was special to be brought on for the first season because you’re there to assist everybody in figuring out the look and performances as well as help engage the audience in the story. They were shooting here in Vancouver and that was great because we could go onset and participate much more in the creative process.”

Image Engine VFX supervisor Joao Sita.
Raisani’s directing background had a direct influence on how he articulated the needs of the production. “The majority of the time Jabbar would approach us with storytelling points [rather] than going straight into, ‘This is the breakdown of the shot. Those are the effects that you have to execute to get the shot to where I want.’ Jabbar’s focus on the story allowed us to explore the visuals in a fairly open way,” says Sita.
Unlike feature films which are projected in 2K, Netflix streams in 4K. “It did change the structure because we needed to prep ourselves in terms of the amount of data that would be pushed to different departments,” Sita notes. “We had to run a lot of tests in regards to the renders and to see how we could alleviate the 4K hit to the last minute. Our pipeline is strong and works in a smart way where we use [Autodesk] Shotgun to help drive the resolution of the work being rendered and the departments render in different resolutions to accommodate the need to have a lot of storage.”
The software toolset did not need to be customized. “We used Maya, 3DEqualizer for tracking, Nuke, Houdini for effects, Silhouette, and Mocha for prep,” Sita says. “Then we have our own proprietary tools like Gaffer that integrates all of the software together and Jabuka which manages all of the assets.”
Most of the concept work for the alien butterfly, broken branch, damaged ship, bisected robot, and the damage states and nebula spill for both the SAR (second alien robot) and humanoid robot were developed internally. “That work was either based on some existing asset that needed to be modified or from scratch,” says Sita.
-- GALLERY: Image Engine Delivers Out-of-this-World Effects for ‘Lost in Space’ --
“For the final battle in episode 10, we came onboard when they had only the first draft of the script. From there we did a couple of previz versions to help define the action, performance of the robots and beats of the sequence,” he continues. “Apart from a couple of shots that required some measurements/setup there was no techviz on our end and then we moved into blocking of the shots. The process was so collaborative that we would get a shot, do our blocking version, and it would be replicated on the client side or the other way around.”
Rhythm & Hues created the model of the robot which was passed on to Image Engine along with a set of textures and QuickTime video for the look. “Everybody uses a different set of tools so we had to spend a couple of days to match the look,” Sita explains. “We did the bisected version which has the torso and legs split apart along with a broken visor, burnt chest and missing limbs in episode 10.”
The robot has an insect-form and a screen-like face that emits an active light source referred to as the “nebula spill” which changes according to his mood. “The rigging was tricky because the robot had split arms plus legs,” Sita notes. “We had to work out how much we could animate the arm without crashing in geometry. We had to break the model and cheat some of the joints to allow the flexible motion.”
The robot has humanoid and attack modes. “They wanted to do the transformation but didn’t want to change the volume; that was tricky because we’re going from something bigger into something much smaller. We took some creative liberties and used a lot of animation that just worked for specific camera positions to communicate the transformation,” Sita continues.
A robot head on a stick and a performer wearing the humanoid mode suit were used as practical lighting references. “Those two elements proved to be essential in making a photoreal robot,” notes Sita. Before the forest fire occurs the legs of the robot are searching for the torso. “We came up with the idea that the robots have guts and internal lights. When legs and torso find each other, the tendrils try to reconnect which causes the branch to crack. Will Robinson [Maxwell Jenkins] takes a wire saw and cuts the branch. They were open to the idea that you did not necessarily have to show all of the bits coming together. Once the branch falls into the fire and smoke you lose the robot. It was neat to see Will looking out and this robot comes out of the smoke back together and jumps to save him.”
Practical elements such as burning trees, stumps and branches were shot with the special effects team which was used as reference for when the fire ignites. Creative license was taken with the wildfire. “A tree will burn to the top but they didn’t want to have that because there needed to be a place for Will to escape so we kept the fire up to two metres high,” Sita recalls. Adjustments needed to be made to the reflective quality of the robot. “Too much reflection turned him into a red robot which at first people understood as being the emergency mode.” A procedural rather than a manual approach was taken when producing the forest. “We created a library of twigs, branches, and trunks.” One FX artist was dedicated to creating the forest. “He would say, ‘There will be x amounts of trees. This is the variation that we want to see.’” Factors such as the different heights and ages of the trees were accounted for when executing the layout while the spreading fire in the nighttime environment allowed for silhouetting and served as the primary light source.
The battle between the SAR and humanoid robots allowed for some creative storytelling. “The shots prior to the fight are mostly practical,” reveals Sita. “Once the fight starts the Jupiter and the Chariot [the vehicle] were set pieces while everything else were CG elements added into the plate.” The energy blasts which were done by a different vendor in earlier episodes were not to feel like electricity so dust and magic spells were referenced. “We had to avoid it looking like a zap or lightning. We did quite a lot of work in FX to convey the idea there’s a charge happening within the hands, that blast hits and wraps around the other character, and then dissipates.” Camera shakes were incorporated and frames were cut to help to imply weight and impact. “Whenever robot falls and drags into something you would see a scratch on the ground or door. Weight is conveyed through pacing and agility.”
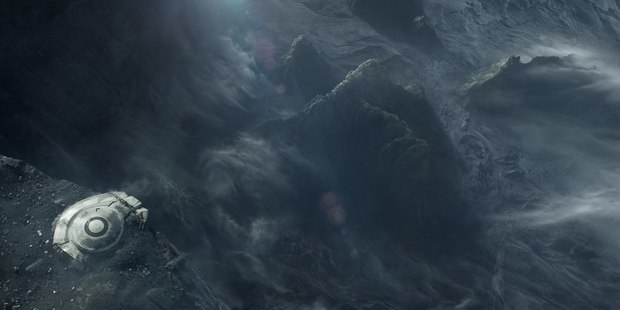
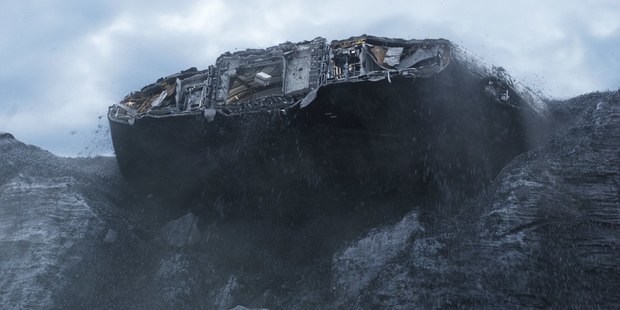
An active quarry in British Columbia serve as the practical location for the crashed Jupiter. “They would go back the next day to shoot that same place but it had changed around,” Sita explains. “The northside we didn’t touch anything because they liked what it looked like but the southside was the cliff so we had a full CG environment called the Black Desert inspired by Iceland.” The base model of the Jupiter was built by another vendor. “We looked at airplane disasters pictures, plane wrecks and a lot of space shuttle references so to understand the layers that were needed between the rooms, like wires, cables and solid platforms. From there we had to cover it up with this element called a diamond rain. The major challenge there was to inform that the ship was covered with that amount of dirt and rocks while sliding towards the cliff. It took a lot of time figuring out the scale of the rocks because if we used the same ones from the plate in our wide shots they would look more like sand. We had to find the midground between dry and humid environments to having big chunks to coming off of the cliff.”
For five shots, an alien butterfly makes an appearance. “We had to do extensive research in regards to ‘what kind of animation does it have?’” Sita says. “We used the color scheme of a sea snail and butterfly references for the veins and fur on the wings.” Producing a believable performance was difficult creatively and technically. “The base motion was inspired by a clip of a sea snail floating in the bottom of the ocean where you see a wave running along the edges of the body which triggers it to move forward. On top of that, we also came up with the idea that once the butterfly lands the wings go up and twist creating a corkscrew motion along with the side wings absorbing and slowing down the landing with some wavy pattern. Although seen in few shots, the creature has been pushed as if it could be a hero character with a very complex rigging and look development.”
“I like a lot the final battle,” Sita concludes. “That’s the one that probably everyone likes the most. It has the longest time, the most action and coolest assets. But the forest fire needed to look photoreal and is not something you see a lot. We knew from the get-go that the battle would be animation and asset work which we’re known for. We had done forests before but the forest fire sequence was unique because we had so much in there from the ground vegetation, fire igniting, embers, smoke, and heat distortion plus it happens at night. I was curious to know how they would treat that in the DI. I was quite happy when I watched the final version. Nothing was lost visually.”


