We complete our quest to rid ourselves of smeared and torn exposure sheets through the nifty use of our computers...
Last month, we created a template for dope sheets using Microsoft Excel 97. As I mentioned then, you could skip this month's column altogether and fill out your dope sheet with a pen or pencil, if you're so inclined. On the other hand, you could also use Excel to fill out some or all of your sheet. Even pen-or-pencil types can find this useful: for instance, if your film follows a regular tempo or a fixed, unalterable soundtrack, you can save yourself some trouble by using these techniques.
What we're going to do here is exploit the computer's inherent math skills to handle the aspects of a dope sheet that are, well, inherently mathematical. After all, if you're going to fill a column of cells with a sequence of numbers, why not get a born number-cruncher to do it for you? Excel, Lotus 1-2-3, and, one presumes, other spreadsheet software have a feature which allows you to fill a range of cells with a series of numbers. Not surprisingly, this is generally called the "fill series" function, and it will be the main focus of this month's column.
Frame Numbering
The astute reader will notice that our template doesn't have any numbers filled in under the Frame column. For the sake of example, let's number our first thirty frames, using an Excel-specific trick (don't worry, we'll cover the more generic method after).
1. Enter the value 1 in the first cell under the Frame heading. Enter 2 in the cell underneath. 2. Highlight both cells. You'll notice the lower right-hand corner of the cell pointer has a black square; this is called the fill handle. 3. Click on the fill handle and hold down the mouse button as you drag the mouse downward. As the cells highlight, you'll notice that a little numerical indicator pops up. This tells you the where the series will end if you release the mouse button. 4. Keep dragging until the indicator reads 30.
5. Release the mouse button.
The fill handle is a nice little shortcut. If you type any two numbers in a sequence, it automatically increases (or decreases, if you drag upward) values by the difference between the two. It even works with text that ends in a number; for instance, two cells reading A1 and A2 can start a series that continues with A3, A4, A5, and so on.
Its major limitation is that you have to drag your mouse from the beginning of the series through to the end. Suppose you had wanted to fill the Frame column up to frame 1000? That's when you do it the long way:
1. Enter the value 1 in the first cell under the Frame heading.
2. Click on the cell you just typed in.
3. From the menu, select Edit, Fill, Series.
4. Click Columns and Linear. Make sure the Step Value, the amount you want each cell to increase or decrease, is at 1. Set the Stop Value at 1000. Click OK. Excel will fill the column with numbers until it hits 1000.
Unlike the fill handle method, you can't use text such as A1 or A2.
Whichever of these two methods you prefer, you can use them to quickly fill any range of cells. But if you want to repeat a series of numbers, such as for a cycle, you don't have to repeatedly fill ranges of cells over and over. That's where Excel's copy and paste function comes in. Let's say that our background will cycle the same 10 drawings repeatedly from frames 25 through 120.
1. Using whichever fill method you prefer, put the numbers 1 through 10 in the BG column, starting at frame 25.
2. Highlight the ten cells.
3. From the menu, select Edit, Copy.
4. Highlight all the empty cells starting from after the "10" and continuing through to frame 120.
5. From the menu, select Edit, Paste.
Using the Fill Handle
Our last look at the fill series function takes care of a common situation: animating on twos. If you're the type who prefers only to write the cel number in every other frame, this is quite easy, using the fill handle (unfortunately, this cannot be done using the fill series function from the menu):
1. Enter the value 1 in the first cell under the Frame heading. Enter 2 two cells below.
2. Highlight the 1, the blank cell below the 2, and the blank cell below it.
3. Click on the fill handle and drag the mouse downward. As the cells highlight, you'll notice that a little numerical indicator pops up. This tells you the where the series will end if you release the mouse button.
4. Keep dragging until the indicator reads the last number you want.
5. Release the mouse button.
If you prefer having each number filled in, then your best bet is to take advantage of Excel's rounding-off feature.
1. Using whatever method you prefer, start with a value of 0.5 and increase each cell value by 0.5 until you've filled all the cells you need.
2. Highlight the numbers you've created.
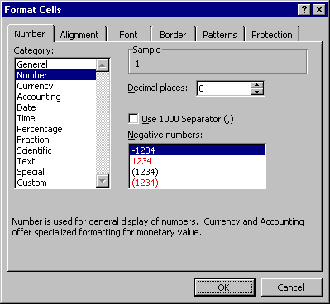
3. From the menu, select Format, Cells. Click on the Number tab.
4. In the Category box, click Number, and set Decimal Places to 0. Click OK.
Adjusting your Cell Format
You'll have noticed by now that whichever method you use, some of our carefully constructed formatting will be altered; you can easily fix that by copying the formatting from an adjacent column when you're finished filling in numbers:
1. Select the adjacent column by clicking on the column heading.
2. Click the Format Painter icon in the toolbar (it looks like a paintbrush).
3. Select the column you want to fix by clicking on its heading.
Finally, let's add a little color to the whole thing. You might want to use color to indicate who will work on a certain segment, or to more clearly differentiate between different cel levels. Whatever the reason, it's not at all difficult to do:
1. Select the cell or range of cells you want to color.
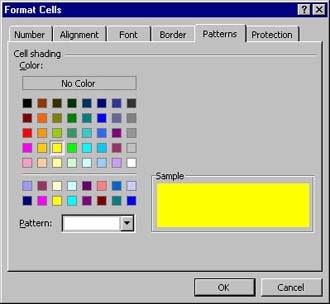
2. From the menu, select Format, Cells. Click on the Patterns tab.
3. Choose a light color from one of the palette shown, then click OK.
If your printer only does black and white, you can still use the shades of grey given. Again, make sure to stick with the lighter greys.
Next month, we'll finally start with the fun stuff, as we look at the different ways you can get your drawings into the computer. Emru Townsend writes about animation and cinema at every opportunity. He resides at emru@pobox.com, and you can visit his Web site at http://www.cam.org/~emru/.


