In VFXWorlds latest excerpt from The Magic of Houdini, Will Cunninghham delves into SOPs, POPs and other silly sounding names.

This is the next in a series of excerpts from the Thomson Course Technology book The Magic of Houdini by Will Cunningham. In the next few months VFXWorld readers will learn the basics of the dominant tool that has been used in the creation of some of the most awe-inspiring animation and cinematic effects ever made.
You have already read in a number of spots weird words like SOPs and POPs. But, what exactly are these near silly sounding names? These strange utterances are short names for the contexts available. Houdini is comprised of a number of contexts. Each of the different contexts has different capabilities and you move back and forth between them to achieve different objectives. Each context has a unique color associated with its menus. This section briefly describes what each of the contexts do so that when you hear them elsewhere in the book, you will have a general understanding of what you can do with each of them. For example, if you see the word POPs, you will know that particles are involved.
OBJs (Objects Operators)
The Objects context, shown in Figure 1, is considered the top level of your Houdini file. Some Object types are like containers that hold geometry operations and other things inside them. For example, you can lay down a Geometry Object and name it apple. Inside the apple Object, you can put all the geometry and shaders you used to create it. This can help keep your files organized and can also enable you to create a digital asset out of the object. For more information on digital assets, refer to Chapter 11, Digital Assets.
There are numerous Object types each with different capabilities. You create the camera and lights for your scene at this level, create bones for rigging a character and more. Generally, though, the Objects context (also sometimes called level or editor) is where high-level operations and organization occur. You might say this is where you set the table with plates, napkins, utensils and condiments.
 [Figure 1] The context menu showing the Objects context.
 [Figure 2] The context menu showing the Geometry context.
 [Figure 3] The context menu showing the Dynamics context.
 [Figure 4] The context menu showing the Particles context.
In this context, networks dont function the same as in many other contexts. In this context, connecting a node to another node is creating a hierarchical chain of parent and child. In this relationship, the child inherits all of its parents and its predecessors transform (translates, rotates and scales). So, you can easily see how Bone objects are used to create skeletal rigs with a foot being parented to an ankle, and an ankle parented to a leg and so on. In most other contexts, connecting nodes together forms a network for passing and computing the aggregate of the operations. This is an important difference to remember.
There are also what I call Object states. These are a bit confusing as they are operations that you can access in the Tab menu over the viewport but not in the Tab menu over the Network Editor. These states often dont create accompanying nodes at the Object level and sometimes dont create nodes at all. I discuss this in more detail in Chapter 4, Object Operators.
SOPs (Geometry Surface Operators)
The Geometry context, shown in Figure 2, is always tied to an Object level node and is contained within it. This is where all the operations occur that actually create and manipulate the geometry that you unwaveringly weave perhaps its a Christmas sweater. This context is considered the meat and potatoes for beginners and often experienced users alike, because they spend much time here whiling away the hours in wonderment. For the vegetarians amongst you, it can just as easily and credibly be considered the tofurkey and potatoes context. Hey, Ive had tofurkey on a number of occasions and it is certainly an adventure!
DOPs (Dynamic Operators)
In this context, you can create dynamic simulations using solvers that simulate rigid body dynamics, soft body dynamics and so on. This is where you define the objects being used, the forces at play and the type of dynamics solution you want to utilize. Just like SOPs, DOP networks can only exist within containers like Objects. The DOPs context menu is shown in Figure 3.
POPs (Particle Operators)
As you progress a little further in your knowledge of the package, the POPs context will likely gain in importance and usage and will become considered the salad and gravy context. The gravy is for the potatoes, not the salad. I say the gravy is for the potatoes because POPs are often intimately connected with SOPs and use them as birthing sources, affecting forces, destinations for passing attributes and more. Ahh, the life of a particle is such a thing to behold. The POPs context menu is shown in Figure 4.
Houdinis particle operators are undoubtedly the strongest and most open set of tools available for creating a wide array of original and challenging effects. Particle simulations are quite adroit in mimicking natural phenomenon and imagined phenomenon, and can be used for all sorts of trickery, where it seems no other solution will do.
 [Figure 5] The context menu showing the Shaders context.
 [Figure 6] The context menu showing the VEX Builder context.
 [Figure 7] The context menu showing the Motion and Audio context.
SHOPs (Shader Operators)
The Shaders context, whose menu is shown in Figure 5, is where you will define the nodes that control the surface appearance of your geometry objects, the characteristics of how lights produce shadow, how atmospheres fill a scene, how photons behave and more. SHOPs is another context where nodes arent connected into networks that pass along information from one to the next. Generally, each node is separate from the others and referenced in other networks for usage.
VOPs (VEX Builder) Are VEX Operators
VEX stands for Vector Expression language and is an expression language used widely throughout Houdini. To understand the differences between VEX and the expression language and Hscript, check out the section called VEX and Expressions and Hscript in Chapter 10. VOPs is a graphical way of accessing and utilizing the VEX language. VOP nodes basically contain little segments of VEX code that you can connect into networks to perform the same functions as hand writing the code in a text editor. For many tasks, it is often much faster and simpler to get rolling with an idea in VOPs using the graphical method. The context menu is shown in Figure 6.
Youll use VOPs most often to create your own surface and displacement shaders. However, you can also use them to create customized particle operators, geometry operators and more. Once you get comfortable in Houdini, VOPs are likely to become the green beans and cornbread of your contextual smorgasbord.

CHOPs (Motion and Audio Channel Operators)
The CHOPs context, whose menu is shown in Figure 7, is a very interesting and often over-looked aspect of the package, perhaps because it is so unique. CHOPs allows you to create, import, modify and export analog waveform data. This context is fantastic for automatically creating the secondary motion of a tail whipping or creating the natural randomness found in the flapping of a butterflys wings.
You will notice that quite a number of channel operators have names traditionally associated with editing sound like delay, pitch and resample. In fact, CHOPs can also be used to import, edit and export audio in the .wav format. One seriously sweet result of this confluence of utilities is that you can use CHOPs to drive animation based on music. Now, you just need Side Effects to also support the import of the .mp3 format and you will all be in for some eye-popping, zombie-staring, up into the early morning enjoyable effort. In their defense, I dont believe that a single one of their current clients is screaming for this capability, likely not even murmuring for it.
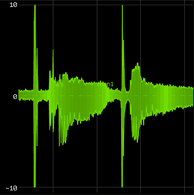
Figure 8 contains a recorded waveform as displayed in CHOPs, which is me zestily saying, Pecan Pie! Hey, thats better than a friend of mine who once taught a class on CHOPs by having his students manipulate a recorded waveform of him belching. You know who you are Papa C! Ahh, welcome to the intriguing and often disturbing world of Houdini artists!
COPs (Compositing Operators)
In the COPs context, you can manipulate 2D images. Most often, this means compositing render passes, but you can also generate texture maps and even manipulate attribute data baked into the image. For example, you can render an image with the normal attribute data baked in and then change the lighting of the scene in 2D. Even more interestingly, you can pass data back and forth into COPs and back out in order to achieve some truly original and powerful functionality. For example, you can pass in the rendered view of a camera, analyze it in COPs and then send out information to other parts of the package, which can then react based on that analysis. In this way, it is possible to model a human and have him or her interact with the environment using a reasonable approximation of actual vision. Figure 9 shows the COPs context menu.
 [Figure 9] The context menu showing the Compositing context.
 [Figure 10] The context menu showing the Outputs context.
ROPs (Outputs Rendering Operators)
The Outputs context, whose menu is shown in Figure 10, is where you create and configure drivers to control how images are rendered, how geometry is written out and more. Houdini comes with a free, production quality renderer called Mantra. It is here in ROPs that you can specify how a frame is to be sent to Mantra. For example, for test renders, you can specify a lower super sampling so that the quality is lower and the speed is faster. You can also choose to write out RIB for RenderMan-compliant renderers.
Find out more about how to apply each of Houdinis features to your projects as you take on modeling, character animation, particle effects animation, dynamic simulation animation, shading, digital asset creation and rendering. The Magic of Houdini by Will Cunninham. Boston, MA: Thomson Course Technology, 2006. 355 pages with illustrations. ISBN: 1-59863-082-2 ($49.95). Check back to VFXWorld frequently to read new excerpts.
Will Cunningham began his trek by studying both traditional art subjects and 3D computer software at the Academy of Entertainment and Technology. After his studies, he was hired as a Houdini technical intern by Side Effects, the developers of the Houdini software package. Eager to create effects for the big screen, he then jumped into production with BlackBox Digital on the feature, The Prince and Me. Shortly thereafter, he also began teaching Introduction to Houdini at the Academy and has since taught both the introductory and intermediate Houdini courses. In the fall of 2004, he was awarded a fellowship grant by Santa Monica College to support his efforts in creating this book. Over the years, Will has worked for a number of production studios on a variety of projects, including The Chronicles of Narnia: The Lion, the Witch and the Wardrobe, Open Season and Ghost Rider. Currently, he is enjoying effects challenges and learning opportunities at Sony Pictures Imageworks.


